Baked Potatoes: Ultimate Guide to Crispy-Skinned Comfort Food

Table of Contents
Introduction
Few dishes evoke that warm, homey feeling quite like Baked Potatoes. Whether you grew up enjoying them on chilly autumn evenings or you’re looking for a reliable side that pleases everyone at the table, this simple root vegetable transforms into pure comfort food with just a bit of heat and seasoning. Personally, I remember my grandmother wrapping hers in foil and letting them slow-roast in the coals of her backyard firepit an old-school method that produced unbelievably tender flesh and a crackly skin. While we may not all have backyard firepits today, the magic of the perfect Baked Potatoes remains timeless.
In the United States, Baked Potatoes often conjure images of weeknight dinners, family cookouts, or late-night cravings paired with a scoop of creamy butter, a sprinkle of chives, and just a hint of nostalgia. From Thanksgiving spreads when the oven is already humming to casual football-watching gatherings, these spuds can fit seamlessly into any occasion. By the end of this post, you’ll understand exactly how to achieve that restaurant-quality exterior crispy on the outside, pillow-soft on the inside using just a few pantry staples and straightforward techniques.
Why You’ll Love These Baked Potatoes
- Effortless Preparation: A handful of simple steps—scrub, oil, season, and bake—mean you can multitask in the kitchen. While your oven works its magic, you’re free to prep a salad, whip up a sauce, or catch up on your favorite podcast.
- Incredible Versatility: Once you master the base technique, you can top them with everything from classic sour cream and chives to creamy mac and cheese. These Baked Potatoes serve as a blank canvas for flavor.
- Budget-Friendly Crowd-Pleaser: Russet potatoes are affordable, widely available, and stretch to feed a crowd. Even if guests spring by at the last minute, you can pop a few more in the oven without breaking the bank.
- Family-Friendly Comfort: Kids love the soft, fluffy interior, while adults can customize toppings to suit any dietary preference—vegetarian, keto, or even vegan. Everyone at the table leaves happy.
- Nutrient-Rich Simplicity: Despite their humble reputation, potatoes offer potassium, vitamin C, and fiber when the skins are enjoyed. Dressed simply with olive oil and a pinch of salt, these Baked Potatoes can fit into balanced meal plans.
Ingredients for Perfect Baked Potatoes
Ingredients for Perfect Baked Potatoes
- 1 russet potato per person
- Olive oil
- Kosher salt
- Freshly cracked black pepper
These ingredients are essential for making classic Baked Potatoes. By relying on high-quality russets, a drizzle of extra-virgin olive oil, and just the right amount of kosher salt and freshly cracked pepper, you’ll let the potato’s natural flavor shine through. If you like an extra-flavorful crust, you can swap up to half of the kosher salt for a smoked sea salt or even garlic salt in a pinch.
Step-by-Step Instructions to Make Baked Potatoes
Step 1: Preheat and Position
Position an oven rack in the center and preheat the oven to 425°F. While this temperature may feel a little higher than what you’re used to for roasting vegetables, it’s key to ensuring the skin crisps up beautifully without drying out the interior. Let the oven stabilize at 425°F for at least ten minutes so it’s evenly heated all the way through.
Test Kitchen Tip: Use an oven thermometer placed near the rack to double-check your real internal temperature. Many household ovens can read 10–15 degrees off, and if the heat is too low, your Baked Potatoes risk turning out limp instead of crackly.
Step 2: Clean and Prep the Potatoes
Thoroughly wash each russet under cool, running water—give the skin a gentle scrub with a vegetable brush to remove any dirt or debris. Pat them completely dry with a kitchen towel. Russets often have nooks where soil hides; a clean surface ensures that the oil and salt adhere properly. Remove any eyes or blemishes with a small paring knife, but it’s okay to leave the skin intact elsewhere; that’s what gives you the best texture.
Editor’s Note: If you prefer eating the skin, rub it with a teaspoon of all-purpose flour after drying to help the oil cling better. It also creates a slightly more rustic, textured finish once baked.
Step 3: Oil, Salt, and Season
Rub each potato all over with a thin layer of olive oil—about one teaspoon per side. Whether you apply with your hands or a pastry brush, make sure the entire surface is coated; this step is what yields the golden, crisp exterior. Next, use your fingertips to sprinkle kosher salt and freshly cracked black pepper evenly over every side. The salt not only seasons but actually draws moisture from the surface, which helps the skin tighten up and get that signature crackle.
Test Kitchen Tip: If you live somewhere with very dry air, lightly mist the potatoes first with water before oiling. The oil will stick even more effectively, and you’ll end up with an extra-crispy finish.
Step 4: Poke Holes for Steam
Use a fork to poke at least four or five small holes evenly spaced around each potato. This little ventilation system allows steam to escape while the inside softens, preventing any pressure build-up that might cause a rupture. Aim for holes about 1/4 inch deep—deep enough to reach the interior flesh but not so deep that you compromise the final bite.
Editor’s Caution: If you skip this step, you might notice that your Baked Potatoes can split open slightly or have uneven cooking. Those pinpricks ensure they cook through evenly from edge to center.
Step 5: Bake on Rack or Sheet
Decide whether to place the potatoes directly onto the oven rack or on a baking sheet. If you opt for a sheet, line it with aluminum foil for easy cleanup, positioning the potatoes a few inches apart to allow air circulation. Transfer them to the center rack. Bake for 50–60 minutes total, rotating them gently with tongs every 20 minutes so each side gets equal exposure to the heat.
Test Kitchen Tip: If you’re short on time, wrap each potato tightly in foil for the first 30 minutes, then unwrap and bake directly on the rack for the final 20 minutes. This hybrid method shortens cooking by about 5–10 minutes while still delivering crisp skin.
Step 6: Check for Doneness
After approximately 50 minutes, start testing for doneness by inserting a fork or a skewer into the thickest part of each spud. When your Baked Potatoes have a fully dry skin and the fork slides in without resistance—yielding to a fluffy interior—they’re ready. If there’s any firmness or resistance, give them another 5–10 minutes and test again.
Cook’s Note: Russets vary in size, so if you chose larger potatoes, the total bake time could stretch toward an hour. Conversely, smaller potatoes might finish closer to 50 minutes. Always test by feel, not by the clock alone.
Once done, remove from the oven. Let them rest for 5 minutes—this brief wait allows residual steam to redistribute, ensuring that when you slice them open, they stay fluffy rather than gummy.
Recipe Variations for Baked Potatoes
Recipe Variations for Baked Potatoes
- Herb-Infused Crust: After oiling, press a mixture of finely chopped fresh rosemary, thyme, and garlic powder into the skin. This variation adds a fragrant, herbaceous note perfect for pairing with roast chicken or steak.
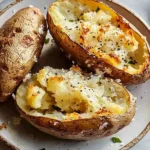
- Cheesy Twice-Baked Style: After the initial bake, scoop out the interior into a bowl, mash with butter and shredded cheddar, then spoon the mixture back into the skins. Return to the oven for 10–15 minutes until the cheese is bubbling. A family favorite on busy weeknights.
- Spicy Chili-Style Potato: Before baking, rub the exterior with a mixture of smoked paprika, cumin, chili powder, and a pinch of cayenne. Once done, top with black beans, salsa, and shredded pepper jack for a Mexican-inspired spin.
- Vegan Loaded Potato: Omit cheese and dairy. Once your Baked Potatoes are done, top with a scoop of hummus, chopped scallions, and a drizzle of tahini for a Middle Eastern flair.
Serving Suggestions for Baked Potatoes
Serving Suggestions for Baked Potatoes
- Classic Comfort Plate: Split a hot potato open, fluff the interior with a fork, then add a pat of butter, a dollop of sour cream, and a sprinkle of finely chopped chives. Serve alongside a crisp green salad and roasted chicken thighs for a balanced, cozy meal. These Baked Potatoes become the star when placed next to juicy proteins and a simple vegetable side.
- Steakhouse Pairing: For an at-home steakhouse experience, top your potato with a slice of melted blue cheese or crumbled gorgonzola while it’s still hot. The creamy tang and hearty texture of the Baked Potatoes complement a seared ribeye or filet mignon perfectly.
- Vegetarian Feast: Load with sautéed mushrooms, caramelized onions, and crumbled feta. Sprinkle pumpkin seeds and a dash of smoked paprika on top. This hearty version turns Baked Potatoes into a satisfying vegetarian entree. Pair with a kale Caesar salad for a complete meat-free meal.
Storage & Leftover Tips for Baked Potatoes
Storage & Leftover Tips for Baked Potatoes
- Refrigeration: After allowing the Baked Potatoes to cool completely, wrap each one individually in plastic wrap or aluminum foil. Store in an airtight container in the refrigerator for up to 3 days. Keeping them well-wrapped prevents the skins from drying out and absorbing odors from neighboring foods.
- Freezing: If you want to freeze for longer, scoop out the fluffy interior into freezer-safe containers. Mash with a tablespoon of butter per potato, then seal and freeze. When you’re ready to eat, let it thaw in the fridge overnight, then reheat in the microwave or in a 350°F oven until warmed through. Note that freezing whole, unmashed baked potatoes can lead to soggy skins.
- Reheating: For best results, preheat the oven to 350°F and place wrapped or unwrapped potatoes on the middle rack for 10–15 minutes, depending on size. The foil-wrapped method retains moisture and yields a soft skin; if you prefer to recapture maximum crispness, remove any foil for the final 5 minutes.
- Next-Day Recipes: Transform leftover potato flesh into classics like potato salad (rinse, chop, and mix with mayo, celery, and dill) or use diced cold Baked Potatoes to make home fries. Another favorite is to pan-fry chunks with onions and bell peppers for a quick breakfast hash—top with a fried egg for a hearty morning meal.
FAQ for Baked Potatoes
FAQ for Baked Potatoes
Q: How long should I bake a medium russet potato at 425°F?
A: For a medium (about 6–7 ounces) russet potato, plan on 50–60 minutes at 425°F. Check doneness with a fork or skewer after 50 minutes; if it doesn’t slide in smoothly, continue baking in 5-minute increments until tender.
Q: Can I bake potatoes at a lower temperature if I’m short on oven space?
A: While 425°F ensures a crisp skin, you can bake at 400°F if your oven is crowded. Increase bake time to 75–85 minutes, rotating halfway through. Just be patient—the lower heat won’t give quite the same crust, but the interior will still be fluffy and delicious.
Q: Is it necessary to oil the potato skin before baking?
A: Coating each potato with a thin layer of oil helps draw out moisture and crisps the skin. If you skip oil, you’ll still have a tasty potato, but the skin will remain softer and less golden.
Q: How do I prevent my potatoes from drying out in the fridge?
A: Wrap individual potatoes tightly in foil or plastic wrap to lock in moisture and protect them from drying refrigerator air. Storing them in an airtight container also helps maintain texture.
Q: Can I use sweet potatoes instead of russets?
A: Sweet potatoes cook a bit faster and benefit from a lower temperature—around 400°F for 45–55 minutes. Their skins are thinner, so skip the poking-holes step or do just two small vents. Flavor-wise, you’ll get a sweeter, creamier experience, but the method is otherwise the same.
Conclusion & Call to Action
Whether you’re a novice cook or a seasoned home chef, mastering the art of the Baked Potatoes is remarkably satisfying. With minimal prep, a handful of pantry staples, and roughly an hour in the oven, you can produce a side dish or even a main fit for weeknight dinners, weekend brunches, and holiday spreads alike. Remember that attention to detail thoroughly cleaning the potato, oiling and salting the skin, pricking holes for steam, and rotating in the oven yields that coveted contrast between crackly exterior and tender interior.
Now that you have this comprehensive guide, I hope you’ll experiment with different toppings, seasoning blends, and serving contexts. Please leave a comment below to share your favorite twist on this classic, and don’t forget to rate the recipe if you found these tips helpful. If you try our method, tag us on social media with #PerfectBakedPotatoes your feedback and photos inspire our community of home cooks every day! Enjoy, and happy baking.
Baked Potatoes
Ingredients
Main Ingredients
- 4 russet potatoes 1 per person
- olive oil
- kosher salt
- freshly cracked black pepper
Instructions
Preparation Instructions
- Position an oven rack in the center and preheat the oven to 425°F while you prepare the potatoes.
- Clean the potatoes thoroughly under running water and dry them off. You can leave the eyes on but remove any blemishes with a knife.
- Apply a bit of olive oil to the surface of each potato, using your hands or a pastry brush for convenience.
- Evenly coat the potatoes with kosher salt and black pepper on all sides.
- Use a fork to poke a few holes in each potato to let steam escape while baking.
- You can either place the potatoes directly on the oven rack or set them a few inches apart on a baking sheet lined with aluminum foil. Bake them for 50 to 60 minutes. Turn the potatoes over approximately every 20 minutes and check if they are done by piercing them with a fork. They are ready when the skins are dry, and the insides feel soft when pierced.