Ultimate Guide to Crispy Grilled Potatoes: A Flavorful Summer Side
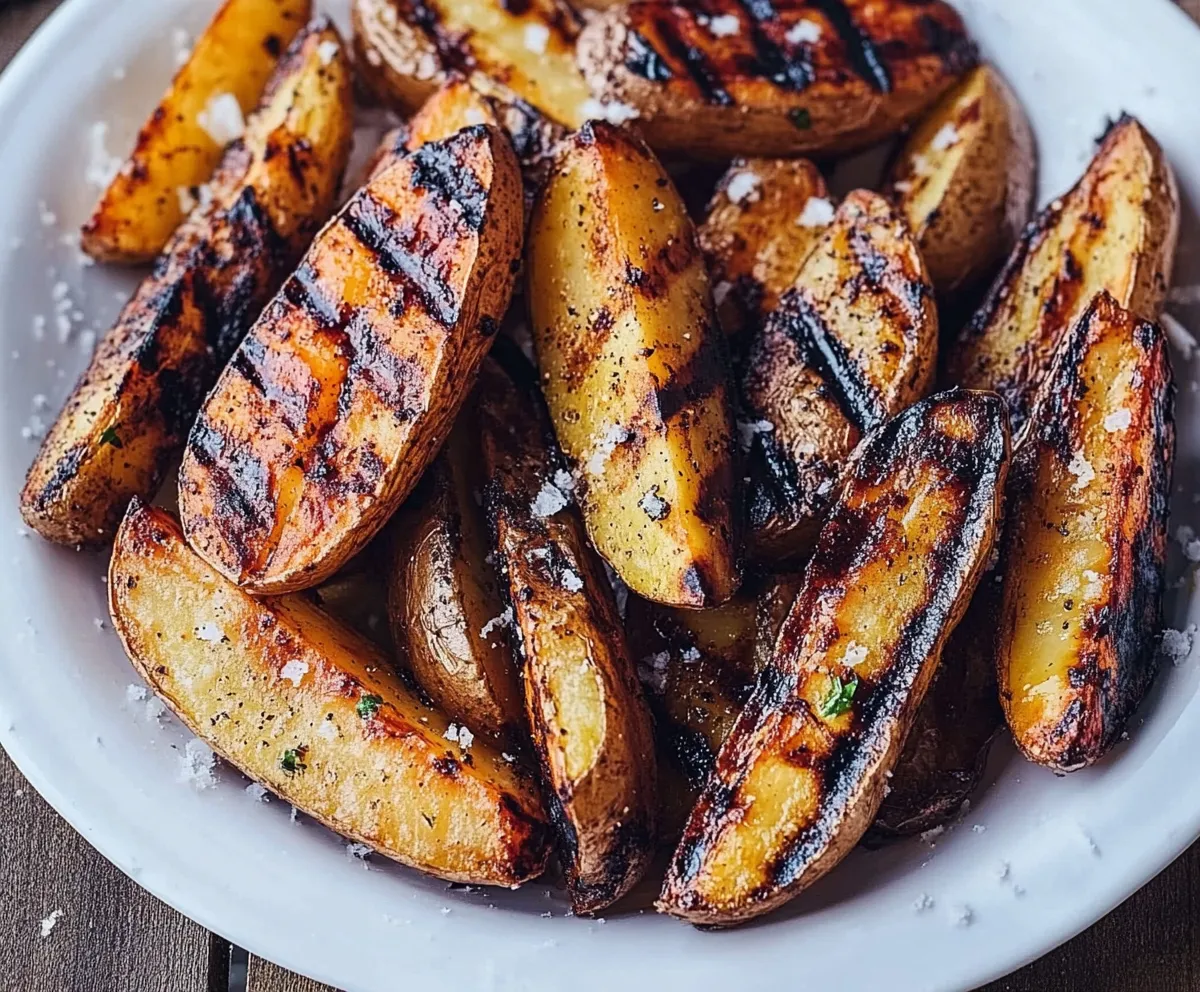
Table of Contents
Introduction
There’s something undeniably nostalgic about a simple batch of Grilled Potatoes sizzling on the backyard barbecue. They bring back memories of family cookouts, summer gatherings, and that first smoky bite that makes your mouth water. Whether it’s Memorial Day, Fourth of July, or just a warm weekend evening, few things say “American summer” quite like perfectly roasted potato wedges kissed by fire. In this comprehensive guide, I’ll walk you through everything you need to know to master Grilled Potatoes, from selecting the best russet potatoes to achieving the ideal char. No matter if you live in the suburbs of Minnesota or the city hustle of Los Angeles, you can bring this easy, crowd-pleasing side to any table in the U.S.
With step-by-step tips, ingredient breakdowns, and troubleshooting advice, this post is designed for both seasoned grill masters and first-time patio chefs. By the end of this post, you’ll feel confident enough to serve up Grilled Potatoes at your next picnic, potluck, or casual family meal. So grab your tongs, fire up the coals, and let’s dive into the delicious world of grilled spuds.
Why You’ll Love This Grilled Potatoes Recipe
- Fast Prep & Cook Time: You only need around 2 minutes to prep and just 16–22 minutes of cook time. In less than an hour from start to finish, you can have hot, crispy potato wedges on your table—perfect for busy weeknights or impromptu gatherings.
- Budget-Friendly: Russet potatoes are inexpensive and readily available in grocery stores across the U.S. A 2-pound bag won’t break the bank, making this recipe wallet-friendly without sacrificing taste or texture.
- Crowd-Pleasing Flavor: The combination of paprika, garlic powder, kosher salt, and olive oil results in a smoky, savory profile that appeals to both kids and adults. Serve these wedges alongside burgers, steaks, or grilled vegetables, and watch them disappear.
- Versatile & Customizable: Feel free to switch up the seasonings—try adding smoked paprika, cayenne for heat, or fresh herbs like rosemary for an aromatic twist. You can also boost the flavor by adding minced garlic, chopped thyme, or even a sprinkle of cayenne pepper for those who love a little kick.
- Make-Ahead Ease: Par-boiling the potatoes can be done the day before. Store them in the fridge overnight and simply grill them when you’re ready. This trick makes hosting easier and minimizes last-minute prep stress.
- Ideal for Any Occasion: Whether it’s a casual backyard barbecue, a tailgate party in the fall, or a cozy family dinner in winter, Grilled Potatoes fit seamlessly. They transition from summer to winter fare by pairing with grilled meats, holiday roasts, or even alongside mashed beans for a vegetarian option.
Ingredients for Grilled Potatoes
- 2 pounds russet potatoes (4 to 5 medium)
Tip: Choose russets with relatively even shape and no green spots. If you’re short on time, you can also use Yukon golds for a slightly creamier texture, though the crispiness may vary. - 2 tablespoons plus 1 1/2 teaspoons kosher salt, divided
Tip: Kosher salt is less concentrated than table salt; if you only have table salt, use slightly less (about 1 1/2 tablespoons total). - 1/4 cup olive oil, plus more for the grill grates
Tip: Use a high-quality extra-virgin olive oil for depth of flavor. If desired, you can swap to avocado oil for a higher smoke point. - 1 teaspoon paprika
Tip: Smoked paprika can also be used for extra smoky flavor that complements the grill. - 1/2 teaspoon garlic powder
Tip: Freshly minced garlic can be substituted; just toss in 2–3 cloves of garlic and be prepared for a stronger aroma. - Freshly ground black pepper
Tip: Grind your pepper fresh for the best flavor. Aim for a few turns of the mill for medium-coarse texture.
Step-by-Step Grilled Potatoes Instructions
- Start by boiling water in a large pot over high heat. Preheat your outdoor grill to medium-high, around 400°F. While waiting, prepare the potatoes.
Begin by filling a large stockpot with enough water to submerge all your potato wedges. Place it over high heat and bring it to a rolling boil. Meanwhile, open your grill lid, and light the coals or turn on your gas burners to medium-high heat (about 400°F). This temperature will ensure you get those characteristic grill marks without burning the exterior before the interior is tender. As the water heats up, get out a colander and any tools you’ll need—this makes transitioning from stovetop to grill seamless. - Clean the potatoes thoroughly. For medium potatoes, slice each one into 4 wedges lengthwise. For larger potatoes, cut them into 6 wedges.
Rinse each russet potato under cool running water, scrubbing gently to remove any dirt or debris. Russets often have a rougher skin, so pay extra attention to any crevices. After patting them dry with a clean kitchen towel, place a single potato on your cutting board. Using a sharp chef’s knife, slice it in half lengthwise, then cut each half into two wedges (for medium potatoes). If your potatoes are notably larger, cut them into six wedges to maintain uniform thickness (this ensures even cooking). Aim for wedges that are roughly ½ inch thick at their thickest point so they cook through without burning. - Add the potatoes along with 2 tablespoons of kosher salt to the boiling water. Bring it back to a boil, then lower the heat to let it simmer for 8 to 10 minutes to par-cook them. The potatoes should not be fully cooked yet.
Once the water returns to a gentle boil, carefully add all of the potato wedges and sprinkle in 2 tablespoons of kosher salt. The salt does double duty here: it seasons the potatoes internally and helps draw out excess moisture, leading to a crispier finish. Allow the water to come back up to a boil, then reduce the heat so the pot simmers gently. Set a timer for 8 minutes, and check for a slight telltale poke with a fork—if the fork slides into the potato but meets a little resistance, you’ve achieved the perfect par-cook. Overcooking at this stage will result in mushy wedges on the grill, so err on the side of undercooking if you’re in doubt. - After cooking, drain the potatoes using a colander.
Once the timer dings, turn off the heat and carefully pour the contents into a colander placed in the sink. Give the potatoes a gentle shake to remove excess hot water. Let them sit for a minute so the steam escapes—this step prevents soggy wedges when they hit the grill. If you’re worried about the potatoes sticking to the colander, you can line it briefly with a paper towel, but be cautious not to let the paper towel touch the boiling water. - When they are cool enough to touch, set the potato wedges on a rimmed baking sheet. Pour 1/4 cup of olive oil over them and sprinkle with the remaining 1 1/2 teaspoons of kosher salt, paprika, garlic powder, and several grinds of black pepper. Use your hands to mix and coat the potatoes evenly.
Allow the drained potatoes to rest for a few minutes until they’re cool enough to handle safely. Transfer them to a rimmed baking sheet, ensuring they’re in a single layer—no stacking. Drizzle 1/4 cup of olive oil over the wedges, then sprinkle on the remaining 1 1/2 teaspoons of kosher salt, paprika, garlic powder, and a generous few twists of black pepper. Wearing disposable kitchen gloves or using clean hands, gently toss the potatoes so each wedge is thoroughly coated. This even coating of oil and seasonings not only adds flavor but also promotes a golden, crispy crust during grilling. - Once the grill is hot, clean the grates if necessary and oil them with a paper towel soaked in olive oil. Lay the potato wedges cut-side down on the grill in a single layer, ensuring they are positioned across the grates. Keep the baking sheet for later. Close the grill and cook until the bottom is golden brown and has grill marks, about 5 to 7 minutes. Flip the potatoes over, cover, and grill for another 5 minutes until they are browned and tender.
Before placing the wedges on the grill, use a grill brush to scrape off any residual char or debris from previous grilling sessions. Dip a folded paper towel in olive oil, grasp it with tongs, and rub it across the grates—this creates a nonstick barrier that helps your potatoes release easily. Arrange each wedge cut-side down so it makes maximum contact with the hot metal. Close the lid and resist the urge to peek too often—lift only once after 5 minutes to check for those beautiful sear lines. If you see a golden-brown hue with distinct marks, it’s time to flip each wedge. After flipping, close the lid again and let them cook for another 5 minutes. Be attentive here—overcooking can lead to dry interiors, while undercooking leaves them firm rather than tender. - Return the potatoes to the baking sheet and mix them with the remaining oil and seasonings left on the sheet. Serve the potatoes right away.
Using metal tongs or a long-grip spatula, transfer the finished wedges back onto the baking sheet. This allows any residual heat in the sheet to blend with the oil and seasoning remnants, ensuring a final layer of flavor. Give the wedges one last gentle toss so they’re evenly coated in any leftover juices, oil, and spice. Serve your Grilled Potatoes immediately, while they’re still steaming hot and crisp. A final sprinkle of flaky sea salt or a dusting of chopped fresh parsley can add a finishing touch before plating.
Recipe Variations for Grilled Potatoes
- Spicy Cajun Grilled Potatoes: Swap paprika for a Cajun seasoning blend (about 1 teaspoon) and include ¼ teaspoon of cayenne pepper. This will give the wedges a bold, spicy kick that pairs perfectly with grilled sausages or burgers.
- Herb & Garlic Grilled Potatoes: After par-cooking, toss the wedges with chopped fresh rosemary or thyme (about 2 tablespoons total) along with 2 cloves minced garlic. The fresh herbs add an aromatic layer that elevates the dish, making it ideal for pairing with steaks or roasted chicken.
- Cheesy Parmesan Grilled Potatoes: Once the potatoes finish grilling, immediately sprinkle ¼ cup of finely grated Parmesan cheese over the hot wedges. Return to the grill for 1–2 minutes (or cover the sheet) to allow the cheese to melt slightly. The result is a crispy, cheesy crust that’s irresistible.
Serving Suggestions for Grilled Potatoes
- Classic BBQ Plate: Pair these wedges alongside grilled chicken breasts, burgers, or baby back ribs. The crispy edges and tender centers perfectly complement smoky meats, making this combination a summer grilling staple. Garnish with chopped parsley or green onions for a pop of color and added freshness.
- Steakhouse-Style Dinner: Pair these wedges with a juicy, cast-iron-seared ribeye or filet mignon. A side of chimichurri sauce or garlic butter transforms the simple wedges into a steakhouse-worthy side. Add a crisp Caesar salad and you’ve got a restaurant-quality meal right in your backyard.
- Vegetarian Friendly: Create a hearty vegetarian plate by pairing the wedges with grilled portobello mushrooms or a hearty bean burger. Top the potatoes with crumbled feta or blue cheese and a squeeze of lemon juice for a tangy, satisfying twist. Include grilled asparagus or zucchini to round out the meal.
- Casual Appetizer: Cut the wedges into smaller spears and serve with an array of dipping sauces—ranch dressing, spicy aioli, or tangy ketchup. Arrange them in a large basket lined with parchment paper, and watch them disappear before your eyes at parties or game-day gatherings.
Storage & Leftover Tips for Grilled Potatoes
Properly storing Grilled Potatoes ensures they stay flavorful and safe to eat for up to 4 days. Place cooled leftover wedges in an airtight container and refrigerate them promptly—do not leave them out at room temperature for more than 2 hours, especially in warmer climates. When you’re ready to reheat, preheat your oven to 400°F and spread the wedges in a single layer on a baking sheet. Bake for about 8–10 minutes, flipping halfway, until they’re heated through and crispy again. If you prefer using the grill, simply lay them out on the grate over medium heat and warm each side for 2–3 minutes. Avoid microwaving, as this often results in soggy potatoes.
For a creative next-day use, chop leftover wedges into bite-sized pieces and toss with scrambled eggs for a hearty breakfast hash. Alternatively, cut them into cubes and mix into a warm potato salad with diced celery, chopped hard-boiled eggs, and a light mustard vinaigrette. These little transformations give your Grilled Potatoes a new life beyond the first meal.
FAQ About Grilled Potatoes
Q: Can I use a different type of potato, like Yukon Golds or red potatoes?
A: Yes, you can substitute russet potatoes with Yukon Golds or red potatoes, but keep in mind the texture will differ. Yukon Golds hold their shape well and have a creamier interior, while red potatoes have a thinner skin that crisps up nicely. If you go this route, reduce the par-boiling time by 1–2 minutes, as these varieties cook faster.
Q: Do I need to peel the potatoes before grilling?
A: No—leaving the skin on adds texture and nutrients to your Grilled Potatoes. Be sure to scrub them thoroughly, as the skin can trap dirt. However, if you prefer a smoother bite, feel free to peel before slicing into wedges.
Q: How can I prevent the potatoes from sticking to the grill grates?
A: Oiling the grates with a paper towel soaked in olive oil is crucial—this creates a nonstick surface. Also, make sure the grill is hot before laying down the wedges, and avoid moving them for the first 5 minutes to allow a sear to form.
Q: Can I bake these wedges indoors instead of grilling?
A: Absolutely! Preheat your oven to 425°F and spread the seasoned wedges on a parchment-lined baking sheet. Bake for 20–25 minutes, flipping halfway through, until golden and crispy. For extra crispiness, finish them under the broiler for 2–3 minutes, watching closely to prevent burning.
Conclusion & Call to Action
Whether you’re hosting a backyard barbecue, planning a family dinner, or simply craving a comforting side dish, these Grilled Potatoes are sure to become a favorite. With minimal ingredients, easy prep, and versatile flavor options, this recipe is perfect for cooks of all skill levels. Don’t forget that a quick par-boil and a hot grill are the keys to achieving that unbeatable balance of crisp exterior and fluffy interior.
Give this recipe a try, and let me know how your Grilled Potatoes turned out in the comments below. If you have any tips, variations, or photos to share, I’d love to see them feel free to tag us on social media or leave a review. If you liked this, try my Classic Potato Salad Recipe. Happy grilling!
Grilled Potatoes
Ingredients
Main Ingredients
- 2 pounds russet potatoes (4 to 5 medium)
- 2 tablespoons kosher salt divided
- 1/4 cup olive oil plus more for the grill grates
- 1 teaspoon paprika
- 1/2 teaspoon garlic powder
- Freshly ground black pepper
Instructions
Cooking Instructions
- Start by boiling water in a large pot over high heat. Preheat your outdoor grill to medium-high, around 400F. While waiting, prepare the potatoes.
- Clean the potatoes thoroughly. For medium potatoes, slice each one into 4 wedges lengthwise. For larger potatoes, cut them into 6 wedges.
- Add the potatoes along with 2 tablespoons of kosher salt to the boiling water. Bring it back to a boil, then lower the heat to let it simmer for 8 to 10 minutes to par-cook them. The potatoes should not be fully cooked yet.
- After cooking, drain the potatoes using a colander.
- When they are cool enough to touch, set the potato wedges on a rimmed baking sheet. Pour 1/4 cup of olive oil over them and sprinkle with the remaining 1 1/2 teaspoons of kosher salt, paprika, garlic powder, and several grinds of black pepper. Use your hands to mix and coat the potatoes evenly.
- Once the grill is hot, clean the grates if necessary and oil them with a paper towel soaked in olive oil. Lay the potato wedges cut-side down on the grill in a single layer, ensuring they are positioned across the grates. Keep the baking sheet for later. Close the grill and cook until the bottom is golden brown and has grill marks, about 5 to 7 minutes. Flip the potatoes over, cover, and grill for another 5 minutes until they are browned and tender.
- Return the potatoes to the baking sheet and mix them with the remaining oil and seasonings left on the sheet. Serve the potatoes right away.